How I Made This: Cape May Jetty

Disclaimer before I start, this is my first photography blog post. Hopefully it's not too awkward, but any feedback about what aspects I should put more or less focus on would be appreciated.
Location Scouting
For this shoot, I drove down to Sunset Beach in Cape May, New Jersey. It's a place I've been a few times, most recently back in February, and I chose this place because of a couple unique features. First, as the name implies, it's a good place to view the sunset. Part of the beach faces west, towards the Delaware Bay, where you can watch the sun set behind the shipwrecked SS Atlantus, a World War 2-era concrete ship. About a half mile away, the beach curves to face south towards the Atlantic Ocean. The second reason is that, being at the very southern tip of New Jersey, it is one of the places with the least light pollution in the state, which makes it one of the better places to see stars at night. Admittedly, the conditions weren't that great, as there were some clouds in the sky, and the moon created a lot of light pollution. The third reason is the jetties. I saw them on my last trip, but spent most of my time photographing different part of the beach, I thought it would be worthwhile to come back to get this shot.
I arrived about an hour before sunset. This gave me some time to walk down the beach, look at the different jetties, and pick the best one. I picked this one as it was fairly long, extended out into the water, and the beach behind it was significantly higher. I took some photos of the sunset while it happened, collected all the gear I needed, then walked back to the jetty I had chosen. Despite it being almost pitch dark on the beach, a few people were still out. Mostly people fishing, a few groups of teenagers, but luckily my chosen jetty remained empty.
Shooting
Setting up a shot in the dark can be a bit of a tedious process. Shooting in the dark, a tripod is a necessity. It's difficult to see what you're actually looking at through the viewfinder, so what you have to do is take a test shot, view it on screen, and make any small adjustments to your tripod and camera position. Typically, for a shot like this, a single exposure might take 15-30 seconds, but test shots can be sped up to closer to 1-2 seconds by doing them at the highest ISO available, then dialing your settings in at a lower ISO and a longer exposure time to get a cleaner image. To prevent any camera shake, I set my tripod up as low as I could, and used a remote shutter release.
Once I got set up, I took what I call my base exposure. This is where the image starts, and then I build on top of it. This exposure was shot at 15mm, f/2.8, 15 s, ISO 1600.
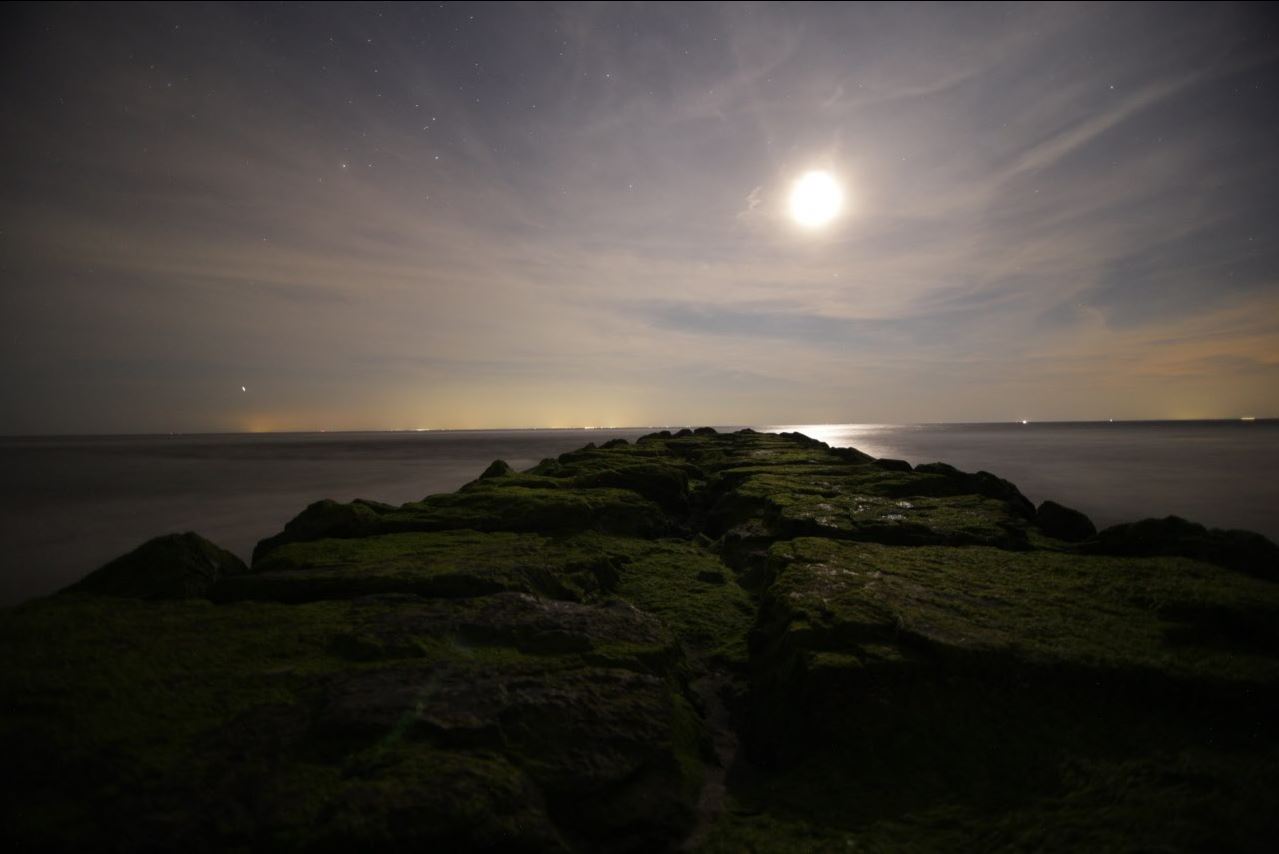
Almost all of the light in this image comes from the moon, which was a little less than half full that night. The moon did a good job of lighting the tops of the rocks, but left a lot of areas in deep shadow with no detail. To resolve that, I use a technique called light painting. That is where you use a moving light source to light an image during a long exposure. For this one, I brought two flashlights with me. I left my camera set up in the same position for about an hour. I would set it to shoot continuously, view my results, and adjust as needed. All in all, I took about 150 shots, and wound up using 6 in the final image.


The first bit of light painting I did was by walking down the jetty, pointing a small flashlight into the crevice that rank down the middle. When I'm doing my light painting, I tend to set my camera to underexpose compared to my base image. This is so that the light you're painting in is more apparent, and ambient light is less likely to interfere with your base exposure when post processing. I also tend to work in shorter exposures, as it gives you more versatility to pick and choose exactly what you want to use.


The second thing I did was walk onto the beach with a much larger, more powerful flashlight. I had mentioned that I was looking for a jetty where the beach was higher, and this why. I wanted to be able to point my flashlight at the tops of the rocks to light them. I was also standing off to the side, as light coming from directly behind the camera would have created a very flat light that doesn't create any shadow, thereby really flattening out the texture of the rocks. In both cases, I swept the flashlight beam up and down the jetty to cover the entire thing.

The third thing I did for this shot involved a flash. I let my camera shoot continuously as I stood in the water with a flash in hand, activating it manually as waves broke on the jetty. While long exposures will smooth out and blur motion, a quick burst of light from a flash till still freeze motion, leading to those well-defined waves.
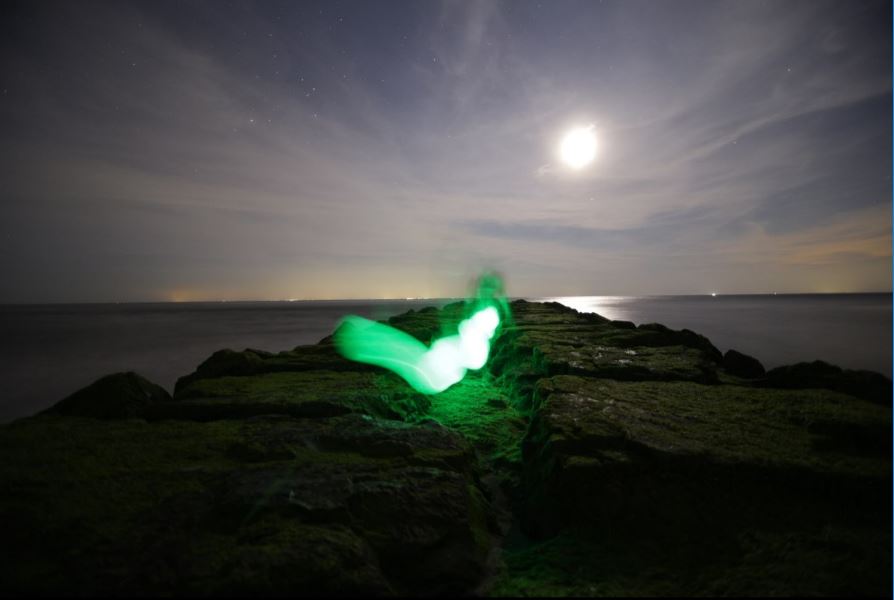
There was some trial and error in getting those shots, and there were a couple other things I tried which didn't make the final cut. I found these glowing balloons at Five Below which I thought would make a cool looking image, but in the end I didn't like the look, plus it caused ghost images of me to show up in the frame that would have been hard to get rid of. The other, I had myself in the frame pointing my flashlight at the moon. I liked these shots, but I tried incorporating them into the final image and it just didn't work out.
 |
Editing
When I'm editing my photos, I start out in Adobe Camera Raw, and try to get as close as possible to what I'm looking for in terms of colors, contrast, etc. This is just the original base exposure image from above, with corrections applied. In addition to the settings shown, I created a graduated filter on the horizon where I increased the contrast and decreased the exposure in the sky, and a radial filter around the moon decreasing its exposure and whites, as well as increasing dehaze. The other thing that isn't immediately visible on screen is my HSL settings. I've found that a lot of night sky photos tend to be very orange at the horizon, and the whole sky can be a little brighter than you want which makes the stars wash out, so I made my oranges more yellow and lowered the saturation and luminance, and the blues were made more purple, increased saturation and decreased luminance.

I did similar Raw processing to my other images and combined them together in Photoshop. The nost important thing was to match the white balance, and on some I lowered the contrast if the light looked too harsh. In my base exposure, there were two blemishes that I fixed. One was the lens flare in the bottom left, which I got rid of by selecting and using Content Aware Fill. I also thought the moon was too bright, so I did the same thing, but put the fill on a different layer, and used layer opacity to determine the brightness.
For all the flashlight exposures, I used the Screen blend mode, which essentially adds light in a way similar to that of a double exposure. I used layer opacity to set the overall brightness (Opacities on these are between 14 and 48%). In blending options, I played with the Blend If sliders to cut out some of the extremely bright light. Then on the layer mask blocked out any light spill I didn't want to see, and used a low opacity brush on the layer mask to reduce the brightness of the light to get exactly the look I wanted. Mostly, to add a bit of detail to the places that were entirely in shadow.
The wave I treated a bit differently. I used the Lighten blend mode, which picks and displays the brightest pixels. Since there was some slight tripod movement during the hour I was shooting, the layers didn't quite line up right, and Auto Align didn't do a perfect job of lining them up, so a bit of manual alignment, manual masking, and clone stamp was needed to clean up the edge where the rocks and the wave meet.
Aside from that, I added some dodge and burn layers to add a bit of drama to the image, an used a couple Nik Collection plugins - Dfine to reduce noise, Viveza to add a bit more contrast to the sky, and the Pro Contrast filter in Color Efex which helps make the image pop a little more.


Comments
Post a Comment